Month: July 2007

  • Bridesmaid Dress Seamstress

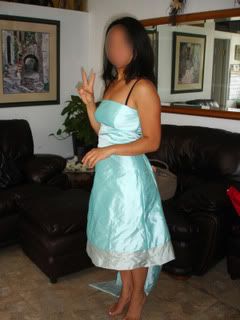
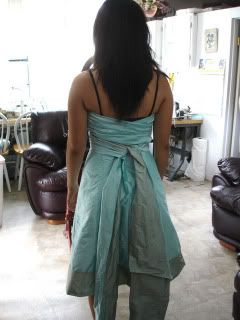
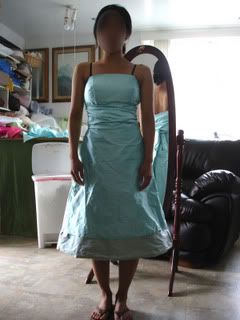
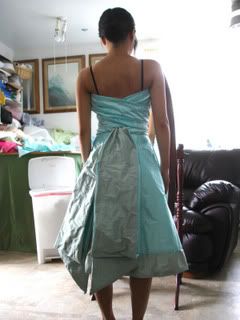
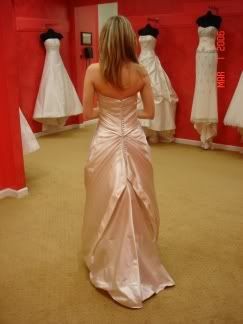
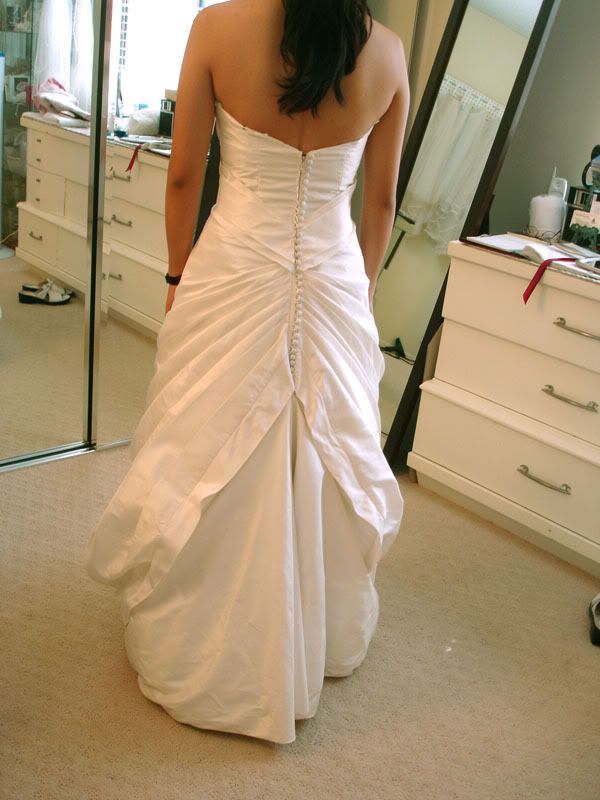
    I picked up the dresses today, and they look fabulous!  She pressed them for me, so the silk dupioni is beautifully crisp rather than very wrinkly like in my previous post.  The quality of work is good, and she nailed the design from one image each of the front and back that I provided.

    Sorry, LA girls, Laura Bravo is out of north OC, but worth the drive.  My two local bridesmaids who live in K-town didn’t mind the two drives they had to make down on Saturday mornings (no traffic time!), though.  I found a few other seamstresses closer to LA proper, but they were around $75-90 for labor on the dresses only. Still not bad at all, for a custom dress, but we couldn’t beat $50 per dress.  One caveat, though, the cost will definitely depend on your specific design.

    She prefers to measure your girls (or you) herself, but she did make my NYC bridesmaid’s dress from measurements her NYC tailor took, and we e-mailed them to Laura.  She then has the dresses pretty much done a couple of weeks before the wedding, and your bridesmaids come in again to try them on.  Ours fit my bridesmaids perfectly, and the only adjustment we needed was to the length of the sash, which she left long on purpose in case we wanted to tie them into bows as I hadn’t specified.  This saved my girls some money, too, since alterations are pretty much included.

    Laura gets very busy in during the summer months, so I’d advise going to see her months in advance.  Especially since you need time for either you or her to shop fabric and notions.  I brought her the fabric, lining, and zippers at our first visit for the quote, and had her provide boning, interfacing, and other notions that I didn’t feel confident shopping since I cannot sew for the life of me.  If you give her a swatch or an idea of what you want, she will shop it for you, but she prefers brides find their own fabric so that she knows it’s exactly what you want, and not just what she happened to find from her sources that is as close as she ccould get.

    Lastly, it’s best to call her after 7 PM on weeknights, as she does this from a workshop behind her house.  She rarely checks e-mail, and only gave it to me for purposes of getting her my OOT bridesmaid’s measurements.  She prefers to do fittings on weekends, but she is very flexible and easy to work with.  I am definitely using her in the future for custom dresses and would highly recommend her.

    Laura Bravo
    Midway City (adjacent to Westminster)
    714.897.5635

  • Bridesmaid Dress Progress

    5 days ago:
    Photo Sharing and Video Hosting at Photobucket

    Photo Sharing and Video Hosting at Photobucket

    Photo Sharing and Video Hosting at Photobucket

    Photo Sharing and Video Hosting at Photobucket

    The sashes will be shortened, the dresses pressed, and ready for me to pick up tomorrow.  I have already picked up the one OOT’ers completed dress.  We used Watters #7415 as the main inspiration for the dresses.  The seamstress did an awesome job at $50 per dress including labor, lining, boning, and any other “hidden” materials I didn’t shop.  A hookup at work got me both colors (a beautiful aqua and a Duchess
    Blue that looks gray in these photos) of dupioni silk for a very
    reasonable price.  Each dress came out to less than $100.

  • No More

    I think I may officially be wedding planned out.  Let’s just say there was a bit of wedding-related drama a few times today, during the work day, while I was trying to meet a deadline on my biggest project.  I was holding it together and really truly not that stressed out until today.  I have noticed that wedding blogs, message boards, and even my pretty porn don’t really do it for me anymore [although that doesn't necessarily mean I'm frequenting them that much less...addiction is hard to break].  Not like they used to, at least.  Good thing we’re almost there.

    Stress is a great motivator for me.  I’ll freak out for a bit then get into the super-potato-production-mode zone.  Ask any of my studiomates.  I get into this zone where I’m super efficient and produce at a decent if not high (for me) quality.  Apparently, I’m in neither freak out nor super-potato-production mode this time.  I’m in lazy bride mode.

    I had grand plans to finish up the last bits of my half-done DIY projects.  Cut this, fold that, lay this out, rubber cement that.  Or to figure out some of the many details I need to pass along to my coordinator.  Cut this check, look over that, revise this list, call people regarding that.  Instead, this is what I have accomplished tonight:

    1. Stayed late at the office finishing up for the deadline.
    2. Dropped by a friend’s in order to be an eyewitness for Week 0 of her Houseplant Challenge.  Oh, and to pick up some things for the wedding from her.  Whee!  Something WR was accomplished!
    3. Did the car shuffle with the bear.  Meh to pseudo tandem parking.
    4. Loaded 70 pounds of river rock and 21 “vases” into my trunk to give my florist tomorrow.  OK, another WR task accomplished.
    5. Chatted online with the friend I just saw during #2.
    6. Made some ramen at the unholy hour of 10 PM.  Bloatage tomorrow morning, here I come!  Mama brand Tom Yum Shrimp, to be exact.  Yay for sour/spicy/savory/salty/overall yummy.
      Photo Sharing and Video Hosting at Photobucket
    7. Surfed some interesting internets that are interesting to me and a few friends, but very few others.
    8. Blogging.

    Now I am waiting for the bear to finish up something so I can help him practice for tomorrow.  I give up.  Maybe another day…

    Good night.*

    *Good thing I’m blessed to not have sleeping problems when stressed.  I am very, very grateful that I’m made this way.

  • Numbering the Years, er Tables

    Our table numbers/menus are done!  I did a simple tent card, since three sides are perfect for a pic of me [at the same age as the table number], a pic of him, and the menu.  It’s great since it can stand on its own, too. No need to find, buy, rent, or borrow any of those [mostly] banal table number holders out there.  Yes, yes, there are creative, beautiful stands for table numbers that don’t have to break the bank, but this lazy bride didn’t even want to bother searching, budgeting or wasting even one extra brain cell on it (they are a rare resource, since bridal brain has kicked in, after all).  I have a large ream of beautiful, bright white cardstock that I bought for under $20 at Kelly Paper for miscellaneous paper projects such as this, so I set out to do something using only my computer, that paper, an inkjet printer, and minimal other supplies. I came up with the following.

    Tower o’ numbers:
    Photo Sharing and Video Hosting at Photobucket

    Tri-cornered goodness:
    Photo Sharing and Video Hosting at Photobucket

    Sides 1+2:  Fatty McTaterstein + Bow-eating Bear
    Photo Sharing and Video Hosting at Photobucket

    Photo Sharing and Video Hosting at Photobucket

    The Menu
    Photo Sharing and Video Hosting at Photobucket

    And now for the how to on what has probably been the easiest DIY project to date. 

    • I laid out an 11×17 (tabloid) sized sheet in Adobe Illustrator.  I wanted to get 2-3 out of each sheet of paper but still have each table tent a decent size.  I ended up with 2 per 11×17, landscape oriented sheet.  Each table tent, flat, measured 17″ wide x 4.5″ high.  Since the printer I was planning on using doesn’t print full bleed, the artwork took up about 16″ wide by 4.5″ high each.  The extra, blank half inch became a tab to which I affixed double stick tape to hold the thing folded together.
    • My wonderful former roommate printed them out for me on her Epson inkjet printer that can print up to 11×17 size.  The one at work broke a few days before I finished designing the layouts, of course, and my company decided not to replace it until we move (a month after the wedding).  And yes, I had my boss’ permission since it was only 10 pages total (20 tables, 2 numbers per sheet). ;)
    • A friend and I cut each one out, to get the full bleed look. 
    • Said friend and I scored each into thirds, plus a little score line at the end for the 1/2″ tab.
    • I folded each, used double stick tape on the tab, which was stuck onto the back of the other end.  Voila!
    • Bonus tip #1 – Find a larger format inkjet printer if you can, over a color laser.  The color lasers at Staples and Kinko’s just don’t cut it when you’re trying to print photos.  I did some test plots there before bugging my old roomie, but the photos came out horribly.  Photo printers (I know, still technically inkjet) work even better, but it’s hard to get a hold of one that can print up to 11″ x17″.
    • Bonus tip #2 – If you don’t have access to anything that can print pages this large, you can also do tall, skinny table tents made of an 8.5″ x 11″ sheet of paper folded in thirds.
    • Bonus tip #3 – If you’re as cheap as me, buy a ream of 11″ x 17″ and have Kelly Paper cut some of it down to 8.5″ x 11″ for you.  They’ll usually do it for free as it’s just cutting it in half.  You get double the number of sheets, if you cut the whole ream in half, for less than the price of buying two reams of 8.5″ x 11″.

    I’m really happy with the way they turned out.  Especially since this is the first DIY project that the bear has truly been impressed with.  My only concern is if it comes in contact with something wet or someone spills, but I figure that my guests will have already found their tables by then.

  • Second Fitting

    It fits like a glove!  I am so glad as I have horrible visions of SDBG (that’s Strapless Dress Boob Gap) in my head, especially since I have virtually no chest.  Now all she has left to do is do the bustle and steam it.  I’ll pick it up a few days before the wedding.

    With the detachable train [how I'll wear it for the ceremony]:
    Photo Sharing and Video Hosting at Photobucket
    [Not me.  It's the bride from whom I bought the dress.]

    Without the detachable train, unbustled [how I'll wear it for pre-ceremony photos].  The sweep train on my dress is a little bit longer.
    Photo Sharing and Video Hosting at Photobucket
    [Again, not me.  This is knottie ctnjbride.  Unfortunately, she no longer has a bio up.]

    The front.  Yes, that is finally me in my actual dress.
    Photo Sharing and Video Hosting at Photobucket
    [I had to hide the no-makeup face.  Bleh.]

    The back, bustled [how I will wear it for the reception].
    Photo Sharing and Video Hosting at Photobucket
    [Hmm...that left elbow is mighty ashy.  Time for some exfoliation.  The top of the back was still hand basted, so it'll be cleaner when the dress is done.]

    Eeeeeeee!  I feel so bridal and comfortable in my dress.  I am so excited to wear it in a couple of weeks.  Stay tuned for a full review of the tailor to come after I pick up my dress.

  • Placecard Lasagna

    Have a slice!
    Photo Sharing and Video Hosting at Photobucket Photo Sharing and Video Hosting at Photobucket

    Photo Sharing and Video Hosting at Photobucket Photo Sharing and Video Hosting at Photobucket

    Instructions can be found here.  I did scale it down a bit, though.  I’m using 2-1/2″ x 3″ inkjet business cards from Staples for the placecards themselves.  I made the overall width 4-1/2″, scored 1/2″ in from each end for the front and end, and scored 1″ between each of the folds that hold the placecards themselves.  Each holder started as a 4-1/2″ x 17″ flat pieces of paper.  After scoring folding, and tying ribbon through, they end up being 4-1/2″ x around 9-10″ long and allow for 8 placecards per holder.  I cut the ribbon in 14″ long pieces as you need some extra to knot it a couple of times so it doesn’t slip through the holes.

    I haven’t printed the placecards themselves yet as we’re still waiting to finalize which guest is at which table, but here’s a screenshot of what we’ve decided.  Red for chicken, aqua for vegetarian.
    Photo Sharing and Video Hosting at Photobucket

    Materials:
    Strips of 4-1/2″ wide x 17″ long cardstock cut from bright white 11″x17″ card stock.
    1/4″ single-faced satin ribbon from Fabric Barn cut into 14″ long pieces.
    1/4″ hole punch.
    X-acto knife & metal ruler to score card stock.

  • Polaroid Guestbook

    One more [pseudo] DIY project down, about 271 more to go!

    Luckily, a friend of mine had an extra Kolo Newport album (11×14 size)…in red!  She sold it to me for a very reasonable price.  I slipped one of our engagement photos in.  Cover, check.
    Photo Sharing and Video Hosting at Photobucket

    I then bought the off-white colored refill pages and gummed photo corners.  Using a mini T-square, a polaroid photo we had lying around, and a gridded self-healing mat, I painstakingly pasted in each photo corner.
    Photo Sharing and Video Hosting at Photobucket

    Here’s a closeup:
    Photo Sharing and Video Hosting at Photobucket

    Now that almost all of our RSVP’s are in (yes, still waiting on a few stragglers), we are expecting about 150 guests.  Many of those guests are part of a couple or family, so we figure they’ll take couple or group photos.  I bought 20 pages, which gives me 40 sides for photos and guests’ signatures.  Each side has sqace for two photos and accompanying signatures/messages, so we’ve got room for 80 photos.  From very informal research (asking a few friends who have done this), it seems that the final number of exposures used ranges from about 30-50% of the total guest count.  Many guests take photos with their S.O., their kids, their group of friends, etc.  Some forget or don’t bother taking the photo and signing.

    The best deal I’ve found for non-expired Polaroid film is Costco.  Ebay’s got some deals, but it seems a lot of the cheaper stuff is expired or close to expiring with no guarantees your exposures will come out.  Costco’s film is almost $45 for 5 packs of 10 exposures each (50 exposures) in store.  Lucky for me, a friend has two Polaroid cameras she is willing to lend me for free.  I’ve wrangled up two friends to be my guestbook nazis (man the cameras and guestbook table).  All I need is a handful of black or brown acid-free pens, and our guestbook is all ready!

  • I Saw the Sign

    Momzilla* is insisting that the city’s signage is not clear enough [it's pretty clear, easy to spot, and it's off of a major road] and that guests will get lost trying to park.  The parking lot is about a one hundred foot walk to the entrance gate of the estate.  She wanted me to ask my venue to provide parking attendants to direct people to the parking lot and then to the walkway that leads to the estate.  Um, no.  The venue does not include that, nor does it have the manpower to provide an extra two people or so.  And I am not sticking any of our guests with that chore. 

    So as a compromise, I had a carpenter friend saw up a few 1/4″ thick pieces of masonite and 3/4″ x 1-1/2″ stakes.  In order to keep the venue’s lawns intact, I will stick them in those silver pails (99 cents each on clearance at Ikea!) and use dirt and/or some of the river rock to weigh it down and keep the sign upright.
    Photo Sharing and Video Hosting at Photobucket
    [Please excuse all the boxes of wedding junk in the background.]

    I originally told my friend I’d be painting these white, so he made he cut and measurement marks all over the wood.  However, I’m running out of time and energy to paint them.  I may just forget it at this point.  I will be printing the text, cutting it out, and using rubber cement to stick them to the signs.  Post wedding, I will peel the lettering off, use my handy dandy rubber cement pickup to get any residue off, and then they will be ready for re-use/reselling.  Now I just need to dig up a fat, coarse eraser to get those pencil marks off.

    *This Momzilla thing is new to me.  She was totally [and happily] uninvolved for the past 12 months, but now that we’re a little less than a month out, she is suddenly demanding all sorts of weird things…

  • Bouquet Locket[s]

    I blogged about a random purchase a few months ago.  Here’s the explanation, copy & pasted from that entry, for the lazy.

    I wanted to honor deceased loved ones in a quiet way.  While, the lit
    candles, reserved chair, etc. work for some, it’s still not subtle
    enough for me and the bear.  I want to honor the bear’s grandmother,
    who pretty much raised him, my grandfather who passed away not too long
    ago and with whom I was pretty close despite a gap of two generations
    and thousands of miles, and my father.  I’ve seen bouquet locket images
    out there, so I found the above earrings to somehow integrate into my
    bouquet.  There are four slots for photos, so I’ll have one extra. 
    While searching for lockets, my treasure troves were
    Etsy, eBay, and Red Envelope.

    Here is the finished product:
    Photo Sharing and Video Hosting at Photobucket

    Photo Sharing and Video Hosting at Photobucket

    I was going to try to find something to put in the 2nd locket, but lazy bride has decided to forget it and just honor those that truly had a big role in our lives.  I took off the earring hooks and put them aside, as I can maybe use them later.  I edited photos in Photoshop, printed them on photo paper, and cut them in tiny circles.  I’ll just have my florist somehow pin or tie them onto my bouquet.

  • Tablescaping, Again

    Lamest table mockups.  Ever.
    57″ rounded corner-ed square table instead of 60″ round.
    Random red chair to stand in for my red napkins and flowers.
    Coffee can to stand in for centerpiece.  It’s about the right diameter, but totally not the right height or shape.
    Absence of votive holders in 2 heights that will also surround the coffee can centerpiece.
    Vinyl wallcovering remnants used for the mockups.

    I thought I liked the runner better (Yeah, it’s too short.  Remember, I was using a remnant.) . . .
    Photo Sharing and Video Hosting at Photobucket

    . . .but then, one day, I woke up and desired something a little less done.  Oh wait, Martha already did it.
    Photo Sharing and Video Hosting at Photobucket

    Finally, our friend, Mr. Coffee Can.  He is playing the role of “scaled figure” today.
    Photo Sharing and Video Hosting at Photobucket

    We’re doing the square in three different patterns, none of which the ghetto pieces above represent.  And yes, I’ve checked to make sure we can fit 8 placesettings around without too many or any plates/flatware/glassware sitting on the edge of our glorified placemats/truncated runners.  Oh, and the square is a 27″ square.  24″ squares worked slightly better, but then I will waste some of my 54″ wide goods.  The runner above was about 13.5″ wide and should have been 84-96″ long.